Few things are worse than your HVAC (Heating, Ventilation, and Air Conditioning) giving up on a scorching day.
The truth is, a new system alone won’t guarantee comfort. A smooth installation is more than just fitting new equipment; it’s about smart planning, precise sizing, and expert execution. In fact, research shows that over 65% of HVAC systems are installed incorrectly, leading to up to 30% higher energy use and poor performance.
That’s why installation matters as much as the system itself. The right process ensures your HVAC system works efficiently, keeps energy bills in check, and maintains consistent comfort year-round.
In this guide, you’ll discover expert-backed tips to ensure your HVAC installation is seamless, efficient, and built to last.
Key Takeaways:
Plan before you install – A smooth HVAC setup begins long before installation day. From load calculations to duct checks, good prep ensures flawless execution later.
Choose the right installer, not just the right unit – Even the best system fails if poorly installed. Partner with certified experts who size, seal, and test every connection.
Precision = Performance – A correctly calibrated system cools faster, runs quieter, and cuts energy costs by up to 30%. Precision pays off daily.
Avoid rookie mistakes – Skipping permits, poor airflow balance, or reusing old parts can cost thousands later. Know the pitfalls and ask the right questions upfront.
Aftercare is everything – Keep filters clean, schedule biannual tune-ups, and watch for any early performance shifts. Small habits protect your big investment.
Partner with pros like Abba HVAC – With licensed technicians, 24/7 service, and a focus on quality, Abba ensures your installation is efficient, compliant, and built to last.
Why a Smooth HVAC Installation Matters
A well-executed HVAC installation defines how efficiently your system performs and how long it lasts. Sometimes, the Texas summer heat and humidity test every unit; that's when precision in setup, airflow balance, and system calibration can make all the difference. The smoother the installation, the better the comfort, efficiency, and long-term reliability you’ll enjoy.
Here’s why getting the installation right from day one truly matters:
Energy Efficiency: Ever notice your bills spike after a new system install? That’s often a bad setup. A precise installation ensures your unit cools faster, runs smoother, and saves up to 30% in energy costs every month.
Longer Lifespan: Think of it like a car engine; tune it right, and it runs for years. When your HVAC is appropriately sized and sealed, you’re not paying for constant repairs or early replacements.
Steady Comfort: No more one room freezing while another feels like a sauna. Balanced airflow and correct duct placement keep every space consistently comfortable.
Cleaner Air: A well-installed system filters air effectively, reducing dust, mould, and allergens — perfect for homes with kids, pets, or anyone sensitive to air quality.
Lower Costs Over Time: A cheap install can cost thousands in the long run due to leaks, noise, and inefficiency. Paying for expert work once means peace of mind for years.
Eco-Friendly Operation: When your system runs efficiently, it consumes less energy, lowering your carbon footprint and helping you stay cool and conscious.
Safety & Compliance: Faulty electrical wiring or refrigerant leaks aren’t just inconveniences; they’re hazards. Certified installers ensure everything is done safely and in compliance with code.
Ready to get it right the first time? Let Abba HVAC handle it. Their licensed, full-service team knows what it takes to get your system running smoothly, from the first bolt to the final test.
Now that you know why a smooth installation matters, let’s look at what you can do before the process even begins.
Key Steps Before HVAC Installation
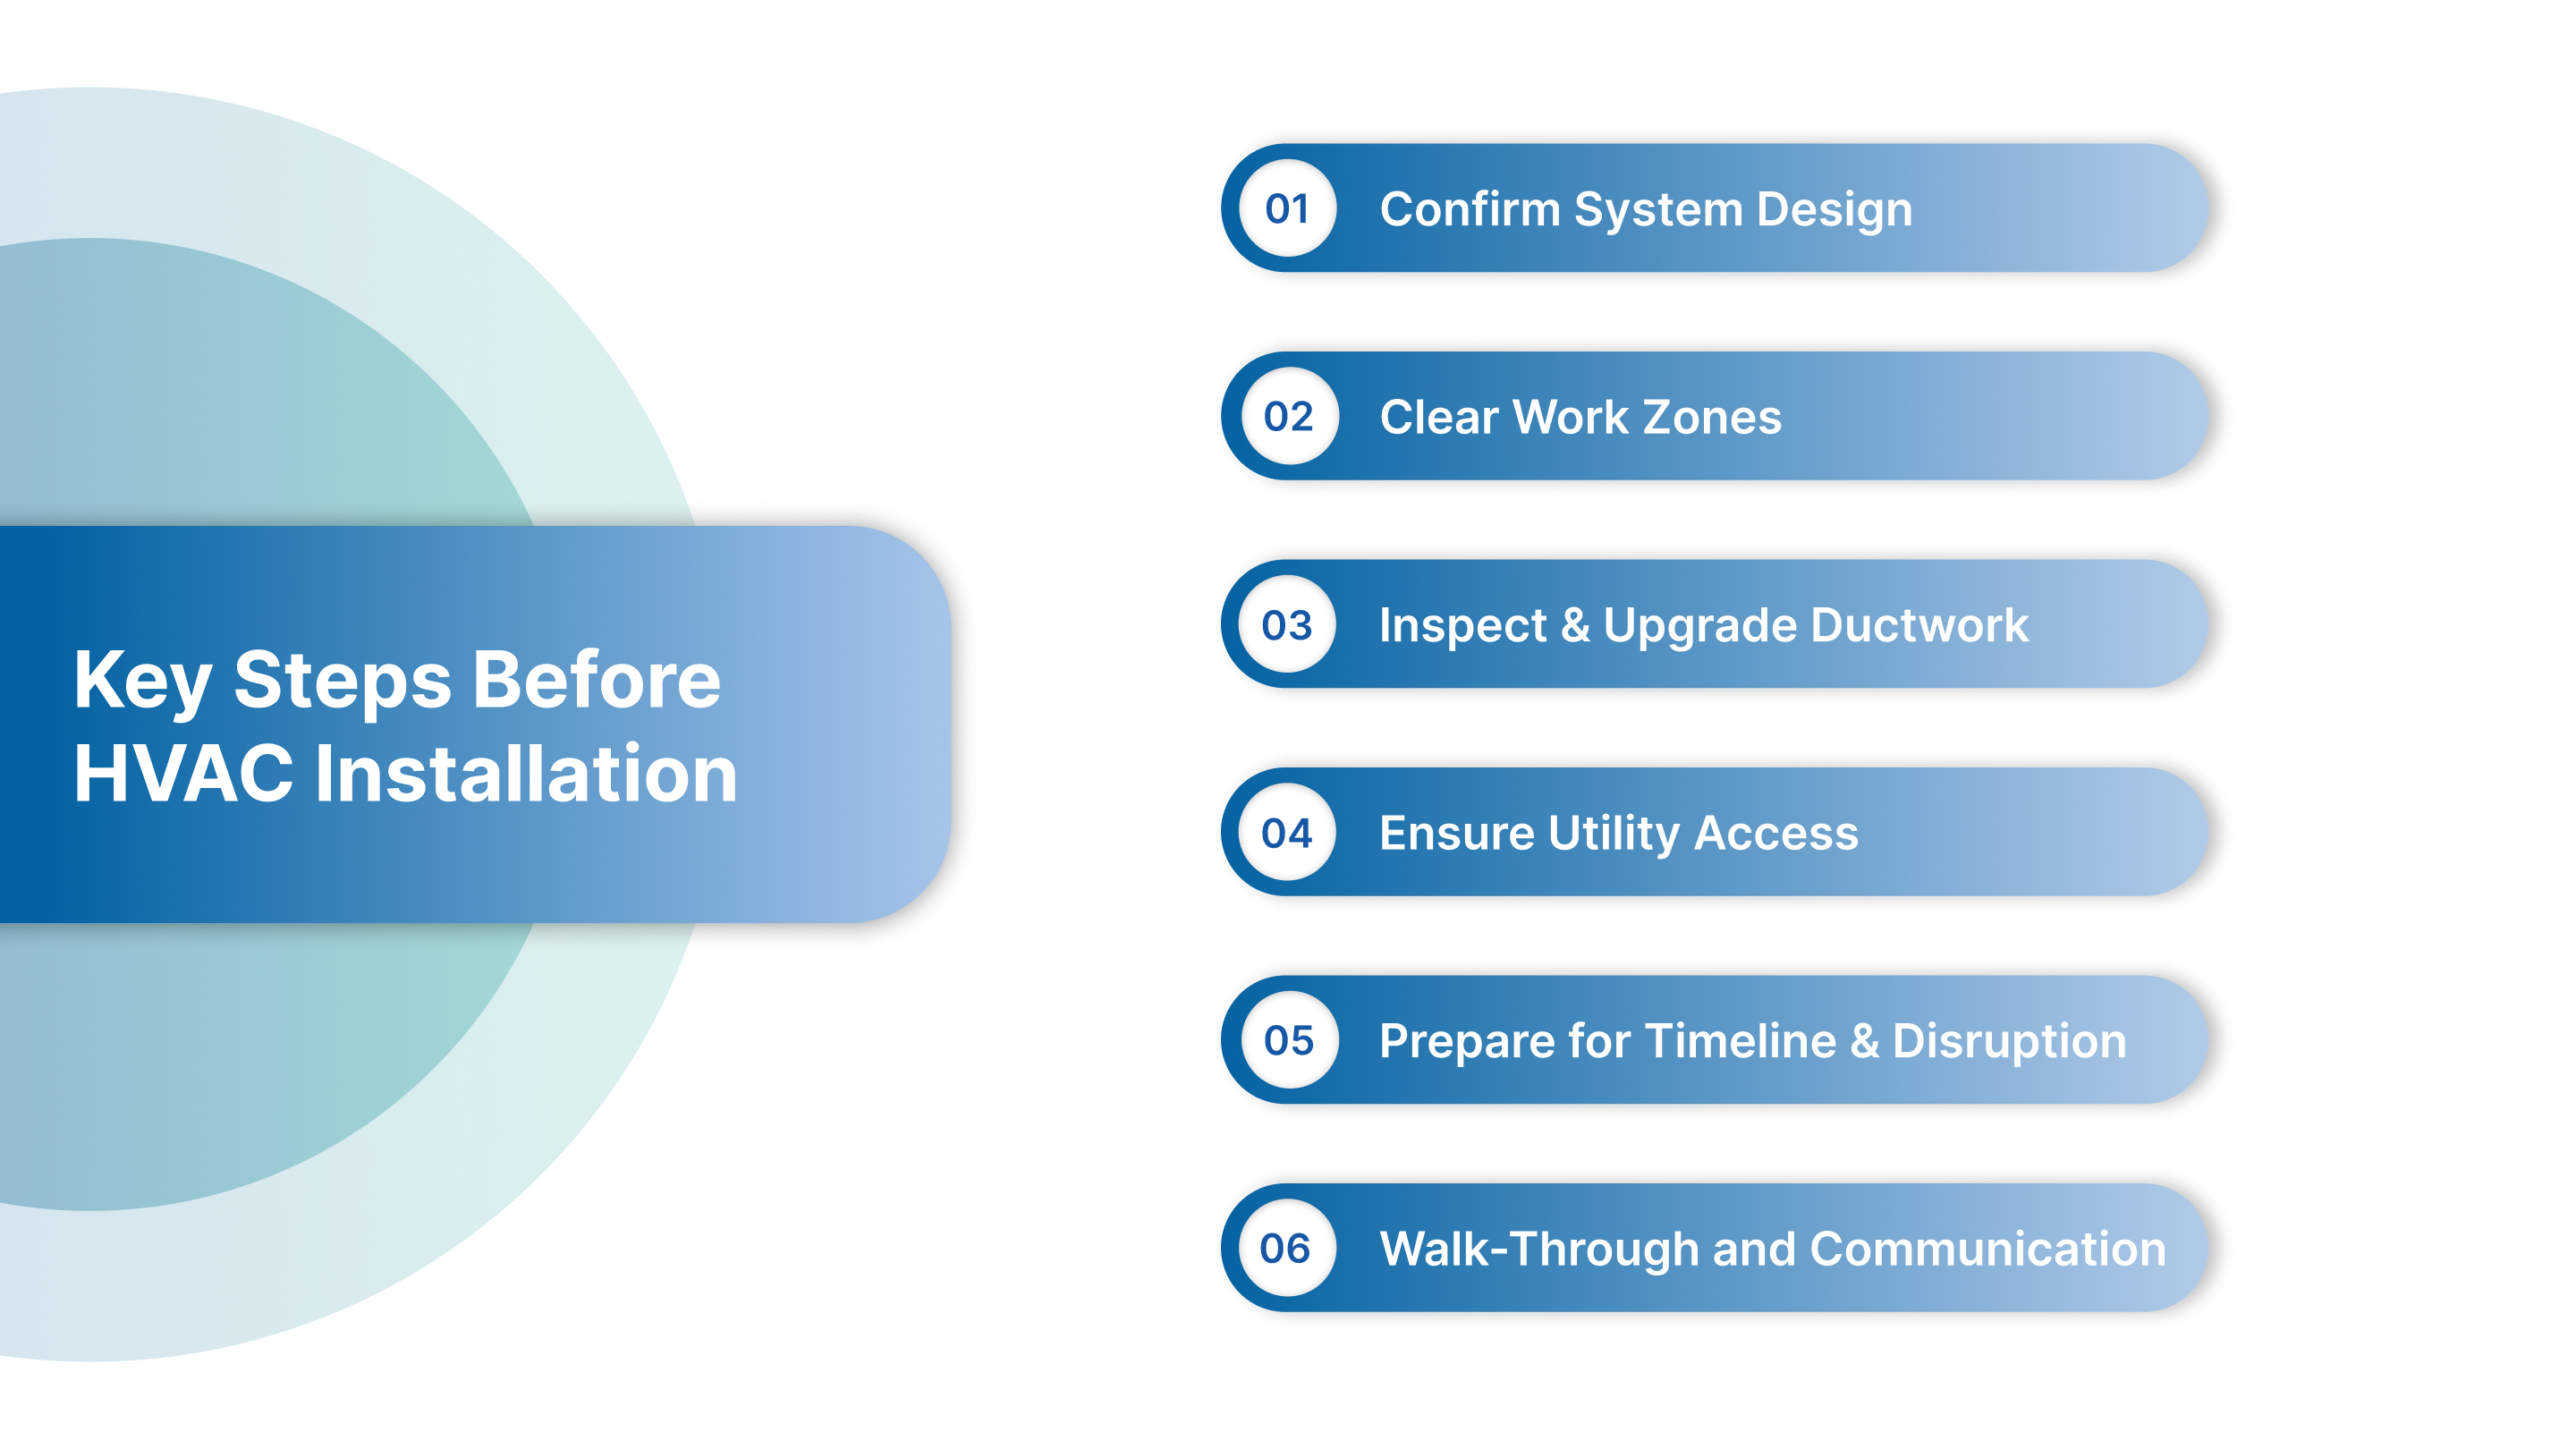
Before the crew walks in with tools and units, the real work starts long beforehand. Getting things lined up in advance doesn’t just speed the job; it saves stress, money, and future headaches.
When you take the right steps ahead of time, the setup goes smoother, the results last longer, and you won’t be playing catch-up afterwards.
Here’s how to prepare like a pro:
Confirm the right system design – Make sure your installer runs a full “Manual J” load calculation and matches the unit to your space. Oversized or undersized systems reduce comfort and efficiency.
Clear the work zones – Indoor and outdoor. Remove furniture, boxes, debris, pets or anything obstructing access so the installation team can move freely and safely.
Inspect and upgrade ductwork if needed – Leaks, insulation gaps, and poorly sized ducts silently kill performance. A quick duct check now can save big later.
Ensure utility access & compatibility – Confirm your electrical panel, gas lines (if applicable), and thermostat location are ready. Missing this often leads to delays or additional costs.
Prepare for the timeline and home readiness – Know whether the job might require one day or multiple. Plan for noise, dust, and potential temporary disruption. Inform your staff or family ahead of time
Plan your initial walk-through and communication – Ask for a pre-install inspection, make sure your installer explains what will happen, and set expectations for the day of install. Clear communication avoids surprises.
With all the groundwork in place, it’s time to move from planning to action.
Key Steps During HVAC Installation
The day has finally arrived: the trucks roll up, the crew walks in, and your planned install steps become real. It’s not just about getting the equipment in place; it’s about every piece being installed precisely, verified thoroughly, and tested until you’re confident it will perform.
Here are the main stages you’ll encounter, so you know what’s happening, when, and why.
Equipment Delivery & Site Setup – Crews stage the indoor unit, outdoor condenser, refrigerant lines, and duct components. For rooftop or commercial installs, cranes or lifts may be arranged.
Old System Removal (if applicable) – The existing HVAC system is safely disconnected, refrigerants recovered, electrical and plumbing lines decommissioned, and the old unit removed per local environmental regulations.
Installation of New Equipment – The new system components are positioned. This includes securing the outdoor unit (or rooftop unit), mounting the indoor air handler or furnace, connecting refrigerant piping, and integrating the system into existing or new ductwork.
Ductwork, Electrical & Plumbing Connections – Technicians connect supply and return ducts, seal and insulate as needed, run electrical wiring and install safety disconnects, and properly install condensate drains and ventilation systems.
Control Systems & Thermostat Integration – Smart thermostats or zoning controls are wired, programmed, and tested. For larger commercial systems, building automation is configured.
Initial Testing & Balancing – Before the system goes live, airflow is measured and adjusted, refrigerant charge is checked, electrical loads are verified, duct pressure is tested, and each zone is monitored for proper performance.
Final Commissioning & Walkthrough – The installer walks you (or your facility manager) through the operation of the new system, hands over manuals, warranty information, and maintenance schedule. They will provide instructions on basic controls and monitoring.
Once the tools are packed away, the journey isn’t over; what you do next decides how well your HVAC truly performs.
Key Steps After HVAC Installation
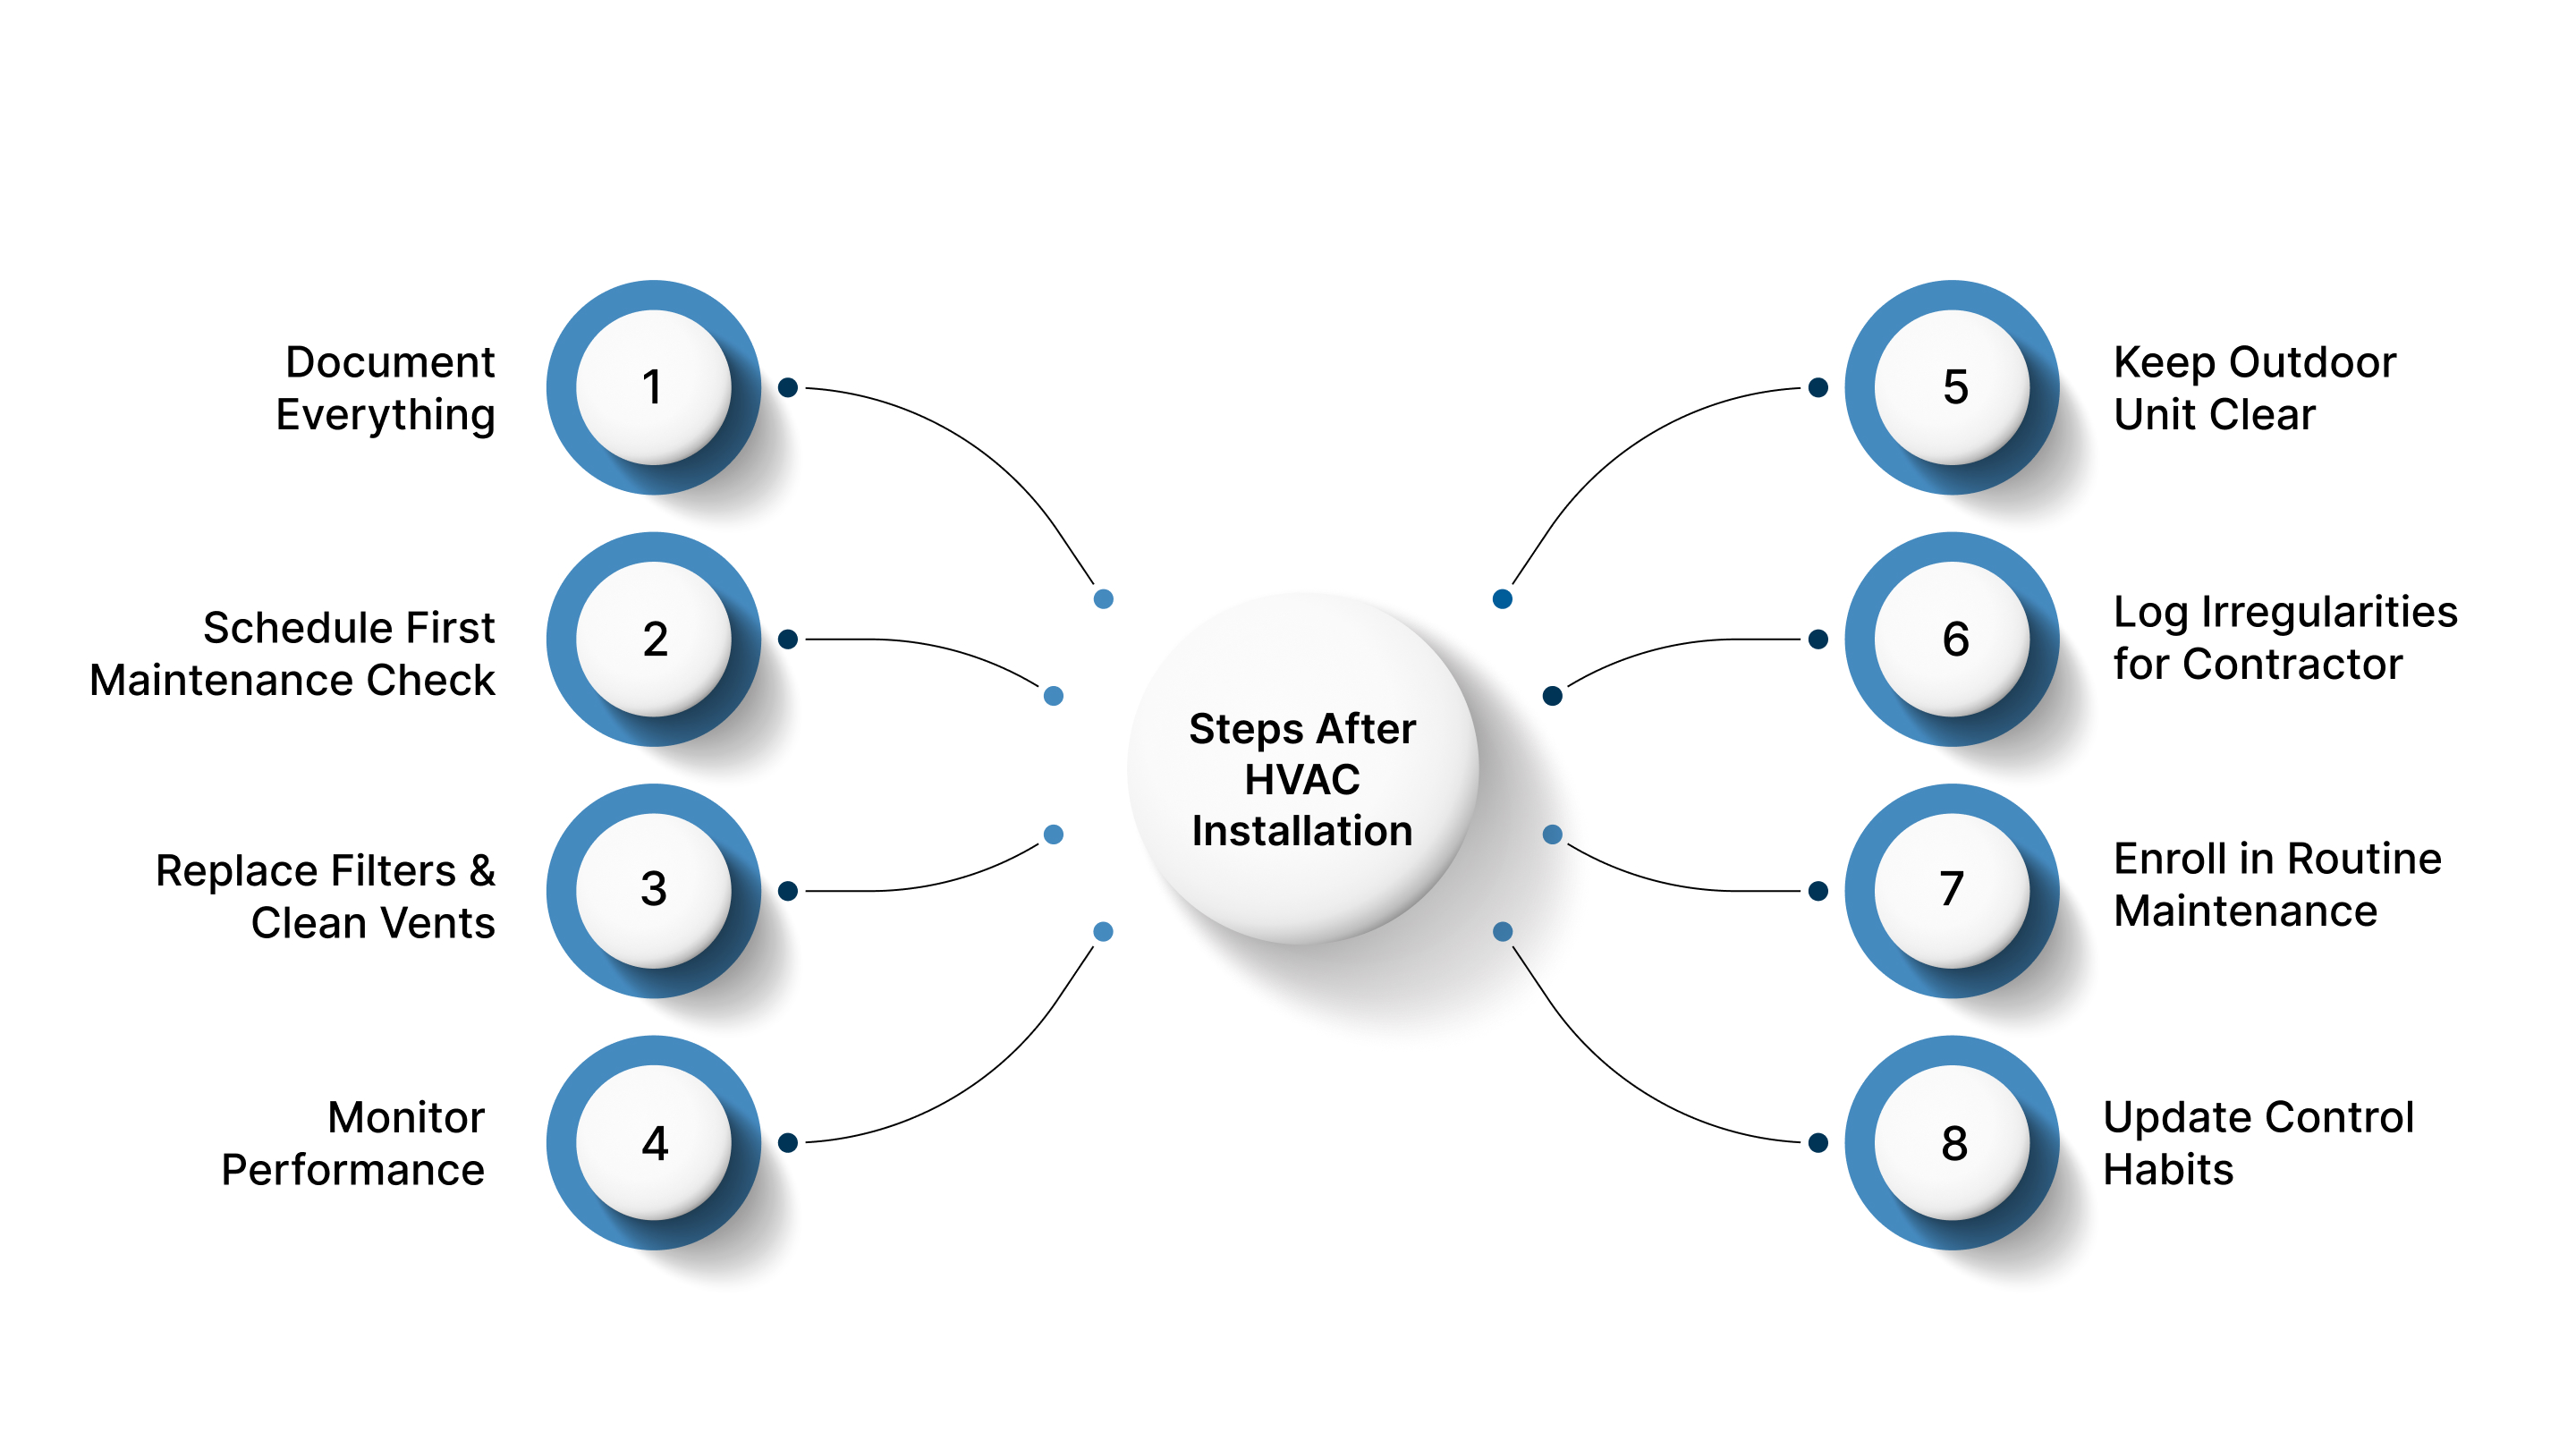
Once the final bolt has been tightened and the air starts flowing, the journey isn’t over; it’s just entered a new phase. It’s this “after-care” stretch that determines whether your system cruises smoothly for years or starts ticking expensive problems off your list.
Here’s what smart homeowners and building managers do after installation to lock in performance and protect their investment.
Document everything — Save receipts, model/serial numbers, installation certificates, warranty info, and contractor notes all in one accessible folder. These form your go-to if future issues pop up.
Schedule the first maintenance check — Many systems benefit from a follow-up inspection about 30–90 days post-install to catch any small tweaks: refrigerant levels, airflow balance, thermostat accuracy.
Replace filters and clean intake vents regularly — A clogged filter or blocked vent undoes good installation work by forcing your system to work harder, reducing efficiency, and shortening the system's lifecycle.
Monitor for change in performance — In the first few weeks, keep an eye on energy bills, comfort levels, and noise. If something’s off (e.g., one room stays warm while others are cool), you’ll want to flag it early.
Keep the outdoor unit clear — Remove leaves, debris, vegetation, and ensure at least a couple of feet of clearance. A well-maintained exterior unit ensures airflow isn’t compromised.
Log any irregularities for your contractor — If you observe unusual smells, sounds, uneven cooling, or shifting thermostat behaviour, note the date/time and inform your installer. Addressing things early avoids bigger fixes.
Enroll in a routine maintenance plan — Signing up for seasonal inspections (spring & fall) helps sustain efficiency, preserves warranty validity, and extends system life. Think of it as insurance for your investment.
Update your control habits — Now that the install is done, make sure you know your thermostat’s features, zoning settings, and how to optimize comfort & savings. A new system needs good user habits to shine.
Even with the right steps and equipment, the real difference lies in who handles the job, and that’s where Abba HVAC stands out.
What Sets Abba HVAC Apart in Quality Installation
When you’re choosing an HVAC installer, you want more than just equipment; you want a partner who knows how to execute it for your space, your schedule, and your long-term savings. Here’s how Abba HVAC stands out:
Full-service expertise under one roof — From ductwork services to electrical and plumbing coordination, Abba’s integrated approach means fewer hand-offs, fewer surprises, and a smoother installation process.
24/7 emergency availability — Comfort emergencies don’t wait. With round-the-clock support and expert heating repair services, Abba ensures your system gets back up and running fast — day or night.
Licensed, insured, and committed to high standards — Every system undergoes post-install testing and routine HVAC tune-ups to maintain efficiency, performance, and compliance with local codes.
Focused on system precision and performance — From load calculations to airflow balancing and heat pump services, Abba ensures your setup isn’t just installed — it’s optimized for real-world performance.
Transparent and customer-focused — Beyond installation, Abba helps you prepare your system year-round with proactive care, such as cooling system winterization, keeping your comfort consistent and stress-free.
Now, even with the best plans, a few missteps can turn an excellent installation into a costly headache. Time to look at the most common mistakes homeowners should avoid.
Common Mistakes to Avoid During HVAC Installation
Many homeowners unknowingly make small mistakes that lead to bigger problems later, like uneven cooling, energy waste, or costly repairs. Understanding these pitfalls before installation can save time, money, and stress.
Here are the most common HVAC installation mistakes and how to avoid them.
Common mistake | Why it happens | Real-world impact you’ll see | How to avoid it (what to ask/check) |
|---|---|---|---|
Incorrect sizing (oversized or undersized unit) | The installer skips or shortcuts the Manual J load calculation. | Short cycling, humidity problems, higher bills, and shorter equipment life. | Ask for the Manual J report. Verify equipment matches square footage and insulation levels. |
Leaky or uninsulated ducts | Old ducts were reused or poorly sealed during installation. | Uneven rooms, wasted cooled air, dust influx, and big energy loss. | Request a duct leakage test and sealing. Insist on insulated ducts in attics. |
Wrong refrigerant charge | Charging by guess or not using proper gauges. | Reduced cooling capacity, compressor stress, and higher energy use. | Ask for measured refrigerant charge and pressure readings on the commissioning report. |
Poor airflow / blocked returns | Ducts too small, vents closed, or blower mis-sized. | Weak airflow, hot spots, noisy vents, frozen coils. | Watch for balanced airflow tests. Ask for CFM readings for key rooms. |
Improper condensate/drain setup | Shortcuts on the slope, wrong piping, or no trap. | Water leaks, mold growth, system shutdowns, and property damage. | Confirm proper condensate routing, trap, and slope during walkthrough. |
Electrical undersizing or improper hook-up | Old panel limits ignored, temporary wiring used. | Tripped breakers, unsafe wiring, unit not performing. | Verify panel capacity and dedicated disconnects. Ask for electrical compliance proof. |
Skipping permits or inspections | To save time or money. | Potential code violations, insurance/warranty issues, and resale problems. | Ask to see permits and final inspection sign-offs before payment. |
Reusing incompatible components | Old coils, mismatched fans/blowers, or incorrect thermostats are kept. | Reduced efficiency, warranty voids, and control problems. | Require all critical components to be matched by model numbers and documented. |
Poor outdoor unit placement | Too close to walls, poor clearance, debris-prone spot. | Reduced airflow, higher noise, and accelerated wear. | Check for 2–3 feet clearance, a solid level pad, and unobstructed airflow. |
No commissioning or poor testing | The installer leaves without full system verification. | Undetected issues, poor performance, and early failures. | Insist on a commissioning checklist and signed report before final payment. |
Wrapping Up
A smooth HVAC installation isn’t just about new equipment; it’s about getting every step right, from sizing to testing to long-term care. When done correctly, it saves you energy, money, and countless headaches down the line.
With Abba HVAC, you get a team that understands exactly what your home or business needs, not just today, but for every season ahead. Licensed, insured, and available 24/7, they make sure your comfort never skips a beat.
Ready to upgrade your comfort with confidence? Get in touch with Abba HVAC today and schedule your expert installation or consultation.
FAQs
How long does a professional HVAC installation take?
Most standard HVAC installations take one full day, though complex systems or duct replacements can extend to two days. Proper testing and calibration are key before completion.
What should I do to prepare my home for HVAC installation?
Clear the workspace, ensure access to the indoor and outdoor units, and move fragile items. It’s also smart to discuss power requirements and duct conditions with your technician beforehand.
How can I tell if my HVAC system was installed correctly?
Consistent temperatures, quiet operation, and regular energy bills are signs of proper installation. Request a commissioning report from your installer for confirmation.
What are the most common HVAC installation mistakes to avoid?
Incorrect sizing, leaky ducts, poor refrigerant charging, and skipped inspections are the top errors. These can lead to high bills, uneven cooling, and reduced system life.
How often does HVAC installation need maintenance afterwards?
Your HVAC system ideally needs maintenance twice a year. Once before summer and once before winter. Regular tune-ups keep it efficient, reliable, and long-lasting.